
I discovered the technique of Zentwining as I was working on the drawings for the fronts of the Tangle Deck cards. I needed a drawing for the tangle Onomato. I picked up a piece of paper that I had drawn some random overlapping curved pencil lines on and began to draw ribbons wrapping around the lines. I then filled each ribbon with a variation of Onomato. I really liked the result and thought “this could be a technique that could be repeated easily.” I decided to share it and call the technique Zentwining.
1. The first step is to draw some overlapping curving pencil lines as in the following examples.

2. Next start drawing in ribbons that wrap around these lines. The ribbons are drawn in a similar way to the technique used in the tangle Aquafleur. I’ve used both re-curve and c-curve versions as shown below.


Here is an example.

3. Ribbons can go in any direction, extend off the page, and even cross lines. Using the Hollibaugh method of drawing behind makes it even more interesting.

4. Once you are satisfied with the quantity and placing of your ribbons, the next step is to draw over the pencil lines with pen making sure you stop at the edge of each ribbon and then start up again on the other side. Here is an enlargement so you can see what I mean.

Here is the drawing with all the lines drawn in pen except where the ribbons cross.

5. Now start adding tangles to the ribbons. You can use variations of one tangle as I did for the Onomato card or use different tangles.

As you can see, any remaining pencil lines are beginning to disappear into the tangles.

6. The final step is to add shading. I add shading to the tangles themselves first, then I add just a touch of shading to each side of the string lines to add a little 3D effect (makes the shapes formed by the strings kind of puffy.) Lastly I add shading to the ribbon shapes if I think it needs it.
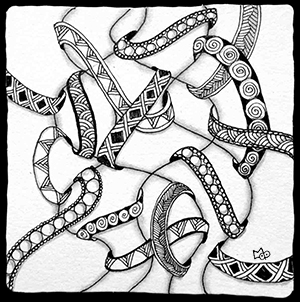
Here are a couple of finished examples.

I will admit that this technique can take some concentration as it can get kind of busy as you work on it. Just take it slowly and be aware of your strokes and you’ll do fine. Hope you have fun playing with this technique and I look forward to seeing what you come up with.
Lynn Mead, CZT
I have been wanting to try Zentwining…didn’t know you were the designer!! I can’t wait to get my Tangle Deck…do you think it will get to Nevada before 9/15?!
I will get to meet you soon at TI:)
Kim, I’m a big fan of your work too. Really looking forward to meeting you in person.
I love this! Thanks so much for the clear directions and examples.
You rock, Lynn! Thanks for this! It’s so very cool. Looking forward to zentwining.
Lynn, another Master lesson, like your Dew drops one. You don’t know how much I learn from you. Thank you so much for sharing your knowledge with us. A big hug from Spain. 🙂
Maria, thank you so much for your comment. It makes me happy to know that people are actually getting something from my posts.
This is so cool and I love your instruction!! very understandable and clear. Thank you! Just found you from a Facebook group!
Way cool! Thanks for the details!
Thanks Betsy, Hope you give it a try.
Lynn – You are such a pioneer to the art. Many thanks.
You are most welcome and Thanks for the compliment. I like the idea of being a pioneer.
This is just too, too cool. So wonderful. Thanks for sharing.
Hope you give it a try.:)
Love this technique. I can get lost in creating ribbons from curves and re-curves. I’m looking forward to exploring this technique further!
Can’t wait to see what you come up with!
Lynn, first the dew drop, now this! Love what you bring to the table. Thanks so much for sharing your creative energy for all to embrace and enjoy!! You are a gem!
Chris, I get so much out of sharing I look at it as a Win Win.
I always admire your Zentangles. Love tie technique.
Sally, thank you. Hope you try it.
Awesomeness!…looks fantastic and great step outs!…
Janet, I always appreciate your enthusiastic comments. Hope you give this a try.
Love zentwining! Thank you for the great tutorial, I can’t wait to give it a try!
Sue, can’t wait to see your version.
thanks so much for sharing this technique, Lynn. I can’t wait to try it. I loved it and commented on it on the Facebook zentangle group. I a, going back to your blog now to see more of your fabulous work. Blessings.
Lynda, thank you so much for the FB zentangle group post. Very thoughtful of you. I’m excited to hear what you think after you try this technique.
Oh! Oh! Oh! This is just too cool! My new ZH (Zentangle Hero)!
Antonine, thanks for the wonderful comment. Hope you give it a try.
Looks fabulous in a brain-twisting kind of way :). Another great tutorial. Thanks Lynn
Tracey, Ha Ha, Yep my brain can get kind of twisted at times.
Zentwining…. Great step outs…what a way to rock & roll ribbons & an Impressive way to show off a monotangle. Thanks for sharing.
Geo, Thanks for the wonderful comment. Can’t wait to see your finished version.
Love it!
Thanks!