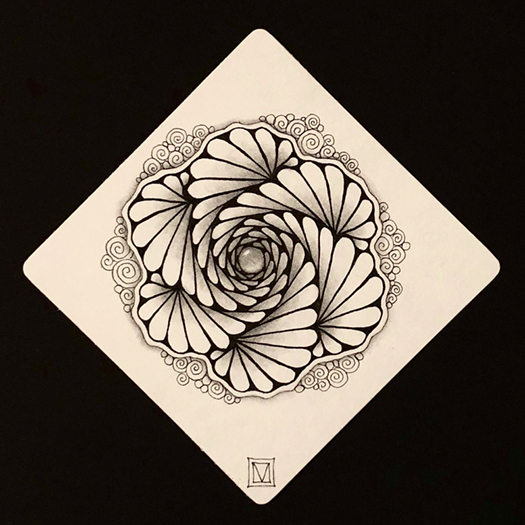
Inktober was started in 2009 by Jake Robinson as a way to improve inking skills and develop positive drawing habits. The idea is to make a commitment to do an ink drawing every day in the month of October and then post it online. For the last couple of years the tangling community has embraced Inktober and this year I participated using the prompts by Stephanie Jennifer on the Square One Purely Zentangle Facebook page. Inktober is over but was a great fun. I found it a good exercise to go back and look at what I accomplished during the month and I’ve made a video of my Inktober tiles to share with you.
A couple of these tiles were variations of the original tangle step outs and there was some interest to see how I drew them. It turned out that both the tiles started with 6 lines either crossed or as a hexagon. Here are the 2 tiles and some step outs I created after the fact to re-create how they were drawn. Please feel free to give these a try yourself.
The focus tangle on the first tile I want to share is Hamadox by CZT Diana Schreur. It is a combination of the Tangles Hamail by Tina Hunziker and Paradox by Rick Roberts.

Here’s how Diana combines the two tangles into Hamadox.

Step 1 is to draw the square
Step 2 is to draw shapes in Hamail fashion around the outer edges of the square
Step 3 is to draw Paradox in the interior of the square and add rounding so it matches up with the curve of the outer shapes
Step 4 is to add rounding around the perimeter to blend it all together
I wondered what it would look like if I started with a hexagon instead of a square? The result intensified the spiraling and overlap effect of the tangle. I find it very pleasing.

Following are the steps for my version.

Start by drawing a hexagon shape. Next, begin adding the shapes around the outer perimeter.

Continue adding shapes along each side, gradually reducing the size in Hamail fashion.

Now start adding the paradox to the interior of the hexagon using the same steps as if you were drawing in a triangle or square, starting from the outside and working toward the center. Hint: adding the rounding to each row as you finish it will help you keep track of where you are.

Continue to the center. Note: on my Inktober tile I added an orb in the center instead of continuing the Paradox to the very center. I would recommend this because it is much harder to keep track of where you are the closer you get to the center. The orb allows you to finish off the Paradox before things get too small.

Finish by adding rounding to the outer perimeter. This combines the outer and inner sections together into the completed shape. Add shading as desired.
The other tile I want to share uses Cross-Ur-Heart by Jenna Black as the focus tangle. Here’s how Jenna draws her tangle.

Step 1 – draw crossed lines
Step 2 – connect the ends to form 4 heart shapes
Step 3 – add “petal” shapes around the outside
Step 4 – add contour lines to the hearts and petals
I wondered what if I added another line and made all the lines curved instead of straight? The result gave the drawing a sense of movement and life.

Here are the steps I took to create this tile.

Step 1 – I added an additional line to the crossed lines creating 6 sections instead of just 4. I also added a curve instead of making them straight.
Step 2 – Same as in original step out, connect the lines to create hearts. I ended up with 6.
Step 3 – I added orbs with petals around them only to the intersections of the hearts. I added a looped shape from the center point of each heart up to the outer point to add a little interest and to create a reference for adding the contour lines.
Step 4 – To finish I added the contour lines, embellished the outer petals and added shading.
I love the way making a minor change to the basic step outs on both of these tiles created a whole new look for each of these tangles. Please feel free to try out my “What If” ideas or better yet try out some “What If” ideas of your own.
Blessings,
Lynn
