Recently I posted on Facebook about my Tangled Floor Cloth Project, and many people were interested in the materials I used and the process of making the floor cloth. The story is a little long for a Facebook post, so I’ve written a blog about it.
I have been intrigued by floor cloths for some time. I spend a week each summer at an Art Camp where you bring your own projects, and each year I try to bring something I have never done before. This confluence of interests and events seemed the perfect opportunity to tackle creating a floor cloth. I currently don’t have the space to work on a project this size at home, so taking advantage of the space provided at camp seemed like a great idea.
Materials:
The material was a bit of an experiment. I got a 5′ x’ 5′ remnant at a local non-profit textile recycling shop called the Ragfinery for $5. It was not the usual numbered cotton duck used for floor cloths but was, I believe, a material used either for upholstery or awnings. It was a heavier synthetic material with a vinyl coating on one side, but it still had a woven texture and lay flat on the floor, so I tried it.

The cloth I bought was wine-red, but I put a coat of white primer on it, so the color didn’t matter. I bought some recycled latex paint at the local Habitat for Humanity store for the base color of the cloth (green). I planned to put this cloth in my kitchen when it was finished, and I had a turquoise paint sample that matched the kitchen walls, so I added that to my painting supplies. I dug out various acrylic paints and paint pens I already had for additional accent colors. I also selected several brushes from what I already had on hand. I experimented with different ways to add shading details, and in the end, I used Faber-Castell Pitt pastel pencils and Pan Pastels (more about that later). I bought a quart of triple thick matte finish Polyurethane to seal and protect the cloth when I was done painting it.


Process:
I cut the cloth from 5′ x 5′ down to 3′ x 5′. The 2′ x 5′ off-cut gave me some cloth to experiment with when deciding on colors and technique.


After painting the cloth with a white primer that promised to stick to practically anything (remember it was already coated with vinyl), I taped off the border area and created the background. It turned out that the color of the green paint I bought wasn’t exactly what I wanted, so I added some of the acrylic paint I had to create a color I liked. I wanted a simple and quick technique for the background because I wanted to spend most of my time on the border. What I came up with was to paint a section with green paint, then go over it with a smaller brush using a swirling movement. This was quick and gave a mottled swirly effect that was interesting but subtle enough to let the border graphics take center stage.


I had a vague idea of the design for the border, and I knew I wanted to use an alternating-color Knightsbridge-ish pattern somewhere. I decided to add a border that alternated white and turquoise in a thin stripe around the outside and inside of the main border area. I was getting some leakage under the painter’s tape, and it was at this point I remembered the trick of laying down the tape and then painting over the edges with a clear acrylic medium to seal the edges. Worked like a charm. Once this narrow border was completed, I used a brush to fill in the main border area with green.

Now came the tricky part, laying out the border elements. I measured the length and width of the border and calculated a measurement for the large Mooka I thought would work as a repeat element around the border. Never having tangled this large before, I was a little unsure of myself, so I cut out a paper template and did a test layout to see if it would work, and it did! I then transferred the template onto some stencil material. I used this stencil to draw the large Mookas around the border. Once these were placed, I filled in the remaining elements freehand. All this was done using a pencil.


To define the border elements, I painted around them with a darker color. I created this color by mixing dark blueish-green and purple acrylic paints. This resulted in a dark blueish color.


Once the dark background of the border was complete, I felt like the design needed more of the turquoise color to tie the cloth to the turquoise wall of the kitchen, so I painted all of the Damsel Leaf turquoise.

Now came the shading of elements. I have to admit I am not an experienced painter. I tried several techniques for adding shading but didn’t like the results. I often use pastel pencils to add colored shading to my Zentangle tiles, and I wanted something similar to that process. I decided to experiment with my Pan Pastels. After all, they call them pastel PAINTINGS, don’t they? I did some tests applying the Pan Pastels with the sponge applicators, then blended them with some large tortillons. This worked incredibly well, as the pastels stained the underlying paint. I was even able to make some adjustments with an eraser. This worked for everything but the white highlight. I ended up using a white paint pen along the edges and spraying the white highlights with acrylic sealer. I knew the pastels would be fine when I added the polyurethane because I wiped the cloth with a wet sponge, and the pastel colors didn’t diminish at all. This was an experiment that was very successful. I also wanted to mention that I used the same blue-ish green and purple colors for the shading that I used to mix the dark blue background. This resulted in a very harmonious color palette.


I should mention the books I read and the videos I watched all recommended that you hem the cloth before any painting is done. I did not have the opportunity to do this before I left for art camp, so I waited until the cloth was completely painted, and I had no problems doing it this way. I used my early 1990s-era Bernina (inherited from my Mom) with a leather needle. I finished the cloth with three coats of triple-thick outdoor-rated polyurethane.

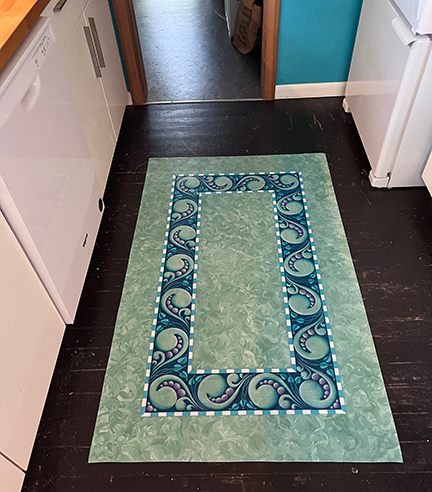
I am so happy with the final outcome, even though I deviated from some of the standard procedures recommended for floor cloths. My first attempt at making a floor cloth turned out beautifully; it lays flat on the floor, is flexible, and I love seeing it when I walk into my kitchen. Many have said they would find it hard to walk on. My response to that is, do you feel the same way about walking on a specially designed area rug? Rugs are meant to be walked on, and so are floor cloths.
I hope you enjoyed this telling of my floor cloth journey and are inspired to try something similar. I think my next “big” project will be a table runner.
As always,
Blessings,
Lynn
This is so cool!!!
You are an amazing visual artist, Lynn! Thank you for sharing your gifts. Even though I am not a visual artist, I enjoyed reading your process.
Thanks for your kind words 🙂
This is stunningly beautiful!! The border is wonderful and I love the way you did the background, too!! Does the cloth slide or move easily? I am a clutz and see myself landing on my tookis…but I’d be closer to the beautiful cloth, so there’s that!😂
Missy, I didn’t mention it in the blog, but I did paint the back of the cloth with a non-slip coating, so no, it doesn’t slip.
Thanks for taking the time to share all the details Lynn. As you know, I think your “experiment” is a gorgeous success. xov
❤️
Lynn,
It’s stunning. It looks like a textured carpet! Thank you so much for sharing your technique. You are so generous with your knowledge.
Love this! Thank you for sharing the process!
I’m new to A Tangler’s Mind and I
Love the Tangle Decks I’ve ordered so far – but THIS! Wow. You’ve sent me back into orbit about the possibilities of this “hobby”. And I truly appreciate how you broke down what you did. It made it seem so much less intimidating to see this as something do-able. (Not that I have the time, space, or patience to do a project that big). You are incredibly talented. Tangle on!
Pamela,
If you wanted to give it a try on something smaller, I think placemats would be a great project 🙂
Thank you for showing us this project-it looks incridible!
Thanks for the kind words 🙂
This is such a fabulous project!! I am in awe of Tangling that big…. you not only did a wonderful job, but explained it so well in this blog post!! Thank you!!
Thanks Krispi <3
Lynn, thank you for taking the time to describe this amazing project! It is absolutely stunning! I wish I could buy one from you for my kitchen!! I really enjoyed reading and watching the project and floor cloth unfold!! Many thanks. Sharon
Thank you Sharon. If I had the space to work I’d make one for you 🙂
I am in awe of this incredible project!