Tree of Life Labyrinth

Recently I wanted to draw a freehand labyrinth. I like the quality of a simple freehand labyrinth and had used the “connect the dot” method in the past starting with a cross in the center. I tried to recreate that version but found that I couldn’t remember exactly how I had done it before. As I was trying to figure it out I stumbled on to this variation that turns out to be very similar, but starts out a little differently. To me it resembles a tree, so I have decided to call it the Tree of Life Labyrinth.

Following is the step-out to create this labyrinth on a 3½ inch tile. As you will see, I have used a numbering system to indicate how to draw the lines. It may seem complicated at first but once you understand the process and draw the labyrinth you will see how naturally it flows from one step to the next until the labyrinth is completed.

STEP 1

Place a dot approximately 1/8 inch to the left of the center of the tile.
Note: placement of this dot will determine where and how your finished labyrinth is placed on the tile.

STEP 1

STEP 2

Place a dot horizontally approximately 3/8 inch to the left and right of the first dot.

STEP 2

STEP 3

Using the same 3/8 inch spacing, add five more dots below the first three dots to create a square.

STEP 3

As a reference for the remaining instructions I am assigning a number, 1 through 8, to each of these dots.

STEP 4

Connect dots 2 and 4 with an inward curved line. Do the same for dots 2 and 5, 4 and 7, and 5 and 7. This will form a curved diamond shape in the center of the square of dots.

STEP 4

STEP 5

You will draw the labyrinth from the center out. Start by drawing an upward curved line connecting dots 2 and 3.

STEP 5

STEP 6

Continue with an upward curved line connecting dot 1 to dot 5. This line should aura the first line keeping the distance between the lines roughly equal. Turning the tile as you draw will help you keep the spacing consistent.

STEP 6

STEP 7

Connect dots 4 and 8 in the same manner.

STEP 7

STEP 8

Continue by connecting dot 6 to dot 7.

STEP 8

STEP 9

Finish by starting at dot 7 and adding a final line around the outside of the labyrinth. Stop at the bottom and add a slight downward curve to create the entrance.

STEP 9

STEP 10

The completed labyrinth is now ready for you to travel to the center and back by adding tangles along the path.

STEP 10

This labyrinth suggests a tree to me so I called it the Tree Of Life Labyrinth and filled it in with tangles accordingly. It was a lovely meditation for me.

Tree of Life Labyrinth

Here is another drawing I made using this labyrinth. Masking fluid was used for the labyrinth with water color marker added over that. When you remove the masking you end up with a white line.

I feel that drawing a labyrinth freehand adds another level to the meditative experience. I hope you give it a try and don’t worry if it is not centered on the paper, that just makes it more interesting.

As usual I encourage you to try anything you see in this blog post in your own work.

Blessings,

Lynn

Threezee – New tangle developed by the CZT crowd

Something interesting happened to me recently. I was busy drawing when an image suddenly popped into my head. It had nothing to do with what I was drawing but it demanded to be put down on paper. This is what it was…

It is a simple motif that is made up of three Zs. This little guy gave me such happy feelings that I did a quick step-out and called it ThreeZee. I didn’t have time to play with ThreeZee right then so I posted it to a CZT page to ask if anyone had seen anything like it or had used the name before.

It was then that a wonderful thing happened. ThreeZee inspired several CZTs to do some explorations and use ThreeZee in some very interesting ways.

First, Marguerite Samama used it as a string on a 3Z tile (how appropriate!)

Tile by Marguerite Samama, CZT

Of course, I had to give that a try too!

I used some of the introductory tangles in honor of the “Z string”.

That made me want to see what kind of meta pattern would be created if I drew it as a fragment in a hexagonal grid. The result was very quilt-like and I had fun adding the tangle Maryhill (by Betsy Wilson, CZT) which gave it real dimension.

Then Jane MacKugler posted a wonderful, colorful, freeform version of ThreeZee. Adding to the basic motif resulted in a meta pattern of stars.

Tile by Jane MacKugler, CZT

Then Diana Schreur, CZT posted another version of this freeform style. She used ThreeZee with her tangle, Connesses, which, similar to ThreeZee, is made up of three Ss. (Step Outs for Conesses can be found on TanglePatterns.com )

Tile by Diana Schruer, CZT

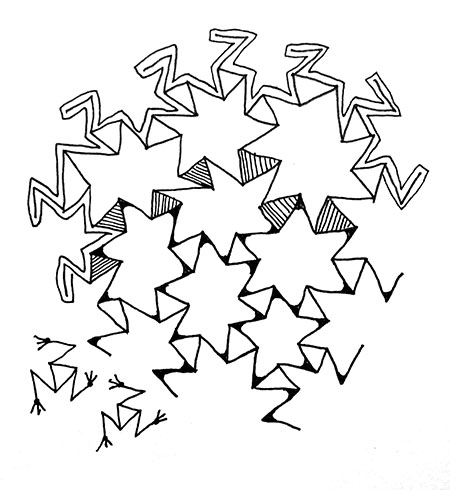
Of course these two tiles inspired me to give this free form style a try too. Also, this question arose, “What do you call a group of ThreeZee? a Cozy of course ; )”

TIP: I did find that it is easier for me to keep track of things when grouping ThreeZee, if I draw the second Z of the motif all the way around to form the star first, and then go back and add the third Z (see illustration below). Also, be mindful that you are drawing a Z and NOT a mirror image.

Use the same method when adding additional ThreeZee to create a grouping.

OR use another form at the intersections of ThreeZee, such as the orbs in this example, and create an even more random grouping.

I call this one “The Soccer/Football Game”

I also played with putting ThreeZee in a circle Reticulum using a curvy Z and some auras. Here is a work in progress drawing so you can see the progression.

Or ThreeZee as a border.

A chorus line of ThreeZee RockettZ

And finally, connecting the “legs” of a ThreeZee motif for an Origami Threezee.

Origami ThreeZee

I just love the way this tangle introduced itself to me and created an environment that inspired others to help develop its potential. Kind of Crowd Sourcing for tangle development or as Rohini Singh, CZT put it recently, I may be ThreeZee’s Mother but Marguerite, Jane, and Diana are the midwives that helped give it birth.

I hope you give ThreeZee a try. As you can see it’s very versatile and I think you will find it will make you happy too. What can be better than that?

Blessings,
Lynn