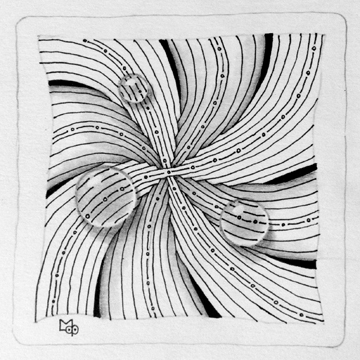
I recently posted this tile with the Dew Drop tangle enhancer (AKA tanglenhancer) on one of the many Facebook pages featuring Zentangle tiles and artwork. There was such a positive reaction to these dew drops that I’ve decided to post a tutorial on how to do them.
First of all let me explain what a tanglenhancer is. It is a technique which can be added or combined with a tangle to change or enhance it’s appearance. In the case of Dew Drops it gives the appearance of water drops on the surface of the tangle.
Here are the steps to reproduce Dew Drops.

Using pencil, define where the dew drops will be when drawing your string.

Using pen, draw your tangles as usual except stop and start the lines at the edges of the dew drops.
Shade all sections except the dew drops.
TIP: Tangles that are mainly constructed of lines are easier to create as Dew Drops. Remember this when choosing tangles for this purpose.

Using your pencil, shade the dew drops as described below:
 Leave an area white for the highlight.
- Add a dark thin line to define the upper edge. Note: DO NOT outline the dew drop in pen.
- Lightly shade the middle of the dewdrop going almost to the the edge.
- Leave a lighter area along the edge opposite the highlight.
- Add a shadow to the outside of the dew drop opposite the highlight.

Variation: If you stop at this point the shapes will appear like pearls sitting on top of the tile.

The final step is to add the lines indicating the tangles underneath. Make sure NOT to draw over the white upper highlight.
TIP: You do not have to duplicate the exact number of lines from the tangle underneath. Start with the line(s) that would cross the middle of the dew drop. As you add lines just increase the space between them to be slightly more than the pattern underneath giving the illusion of magnification. Stop the lines just short of the dew drops edge.
With a little practice you too can enhance your tangles with Dew Drops.
Oh! Oh! Oh! I just signed up to get posts by email, then decided to explore a bit. Thank you for this tutorial. These nice “pearls” and “dew-drops” have been my nemesis and envy. Now I can make them also!
Thank You So Very Much!
Best Wishes, Tracy
Thank you so much for sharing this technique.
Lesley
It worked! I am so impressed!!! Thank you for a very simple explanation for something that actually worked!!!
Joanne, I’m so happy that it worked for you!
I can’t seem to find the Dew Drops Tutorial… only the step outts!!!
The “step-outs” are the Tutorial.
Best Wishes,
Tracy
Wonderful tutorial. Thank you very much for posting.
Thank you for sharing this! I have been looking for it!
This was really helpful Lynn, thanks! I tried it out here with a link to your tutorial:
http://craftsbybetsy.blogspot.com/2015/09/blue-renaissance.html?m=1
Betsy, you did a great job too! Thanks for the credit.
I was looking at your entwining tutorial (also great!) and saw reference to this on a comment ~
Thank you!! This is awesome – Your directions are very clear and easy to understand -I will have to try this too!
sorry I meant Zentwining … spelling auto-correct changed it!
i was thrilled to find this tutorial! I have been wanting to learn how to create dew drops, but didn’t know where to learn how. Thank you so much!
Relatively new to Zentangle and this is a wonderful tutorial. It makes me feel like an artist ;-).
Wow!! I always wanted to know how to draw something like this. Thank you, I’ll give it a go.
Thanks for sharing….I am new to tangling and am in love with it. My mind is like a sponge…..I can’t seem to absorb enough.
Fantastic tutorial, thank you for sharing
This is so clear. I can’t wait to get started.
Thank you so much for taking the time for sharing in such wonderful detail. Can’t wait to start “dew”ing a better job with this enhancer.
Lynn, this absolutely a master class about dewdrops. Thank you so much. Greetings from Spain, CZT14.
Awesome tutorial. Thank you so much, I’ve been waiting to learn how to do dew drops.
Wow! This is so wonderful! Thank you so much for sharing this – and making it so easy to understand. You are the BEST!
You are a treasure, Lynn!
Dear Lynn,
this is amazing. Thank you for sharing the secret of dewdrop (I tried it 2 times, but was “nothing”), so I stoped to try :-/ Thank you for changing my mind!
Merci beaucoup…so well explained…you are the best!!!
Thanks for this, you make it EASY. Appreciate your sharing.
Thank you for this fantastic tutorial.
Awesome tutorial Lynn! This will not only help me but also my students and I know that they will be very grateful to you for posting this! Thank you!
Fantastic tutorial Lynn. Thank you for sharing 🙂
This is the best tutorial on Dew Drops EVER. I love your work and can’t wait to see what you post next! Thank you for the wonderful resource!
Congrats DDD! I’ve been waiting for this!