C-Wing – Square One Focus

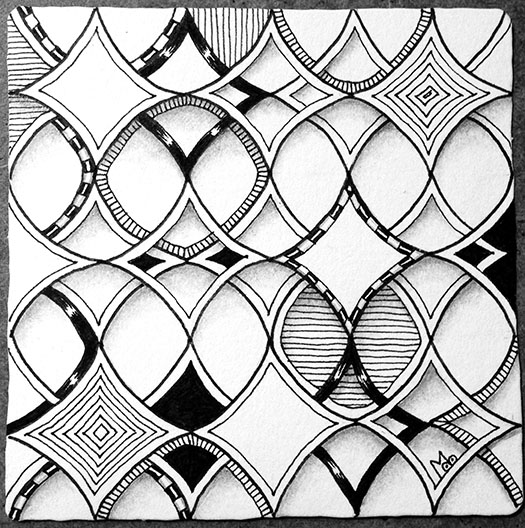
This past week the Square One focus tangle was C-wing by Staub Korn.  It is one I had never tried before so I practiced it a bit in my sketchbook in order to get to know it a little better. I noticed a couple of interesting things about this pattern. First, there is an Ogee grid hidden in the pattern (I’ve gone over it in red in the photo below) and Second, it can be broken down into a Fragment which when mirrored and rotated forms the tangle ( I’ve also indicated the fragment in red).

C-wingSketchIdeas-150ppi

If you are unfamiliar with Fragments, they are a concept that Rick and Maria have introduced in their recent book Zentangle Primer Vol. 1. Fragments are elements that when placed in a grid create a pattern. Note: R&M refer to the grids used with fragments as Reticula. Different patterns can be created by repeating, rotating or mirroring a fragment. But more about that in a later post.

For this week’s tile I started with a dot grid since I didn’t want the lines from a lined grid to show. I chose to use a variation of the tangle that offset the overlapping shapes in alternating rows.

cwing-1-150ppi

I did the main outline with a .05 Apprentice pen. Then I drew an inner aura in each shape with a .01 micron. Some shapes I made see-thru so the shapes behind could be seen. Then I added tone and texture through line and fill.

cwing-2-150ppi

The shading enhanced the effect of the solid and see-thru, the foreground and background. Here’s the final tile.

cwing-3-150 ppi

What I like about this tile is that the tangle is very regular but the fill is unexpected.

As always if you see something in this post that you’d like to try in your own work, please feel free to do so.

Blessings,

Lynn

Tangle Deck 2

Update: Tangle Deck 2 is now shipping. Get 10% off your order thru May 31st by using Coupon Code: 10off when you check out.

Soon I’ll be leaving for Portland, Maine to teach at Tangle U 2016. (For those of you who are not CZT’s Tangle U is a continuing education event for Certified Zentangle Teachers.) But before I go I have an announcement to make.


Store Photo2

Tangle Deck 2 and More Tangle Deck Techniques are a continuation of Tangle Deck 1 and Tangle Deck Techniques. The deck contains 45 more tangles introduced by Zentangle Inc. and I’ve included 3 of my own tangles for a total of 48 tangle cards. The included book,More Tangle Deck Techniques, includes some general tangling techniques AND some specific information about some of the techniques I used in the card drawings.

Update: Tangle Deck 2 is now shipping. Get 10% off your order thru May 31st by using Coupon Code: 10off when you check out.


Click Here To Order

Whirlee – Step Outs

One day a little over a year ago my husband called me outdoors to see and experience something wonderful. It was a windy day and the maple tree in our back yard was sending out clouds of seeds which were whirling gracefully all over the place. This magical experience inspired me to commemorate the event by creating a tangle that I call Whirlee. Instructions for this tangle are on TanglePatterns,com but I have updated them and wanted to share them here:

maple-seedIf you are unfamiliar with maple trees, here is what the seeds look like. They are shaped in such a way that when they are blown from the tree they whirl like a helicopter blade and this lets them “fly” away from the tree.

I broke them down to their simplest shape and stylized it a bit. Then found that I could combine the shape in a lot of different ways.

WhirleeVariations

Here are some additional drawings that I did using Whirlee.

WT2-webWT4-webWT1-web

Hope you give this one a try and enjoy it’s versatility.

Lynn

Zentwining

The drawing on the Tangle Deck card for Onomato is an example of Zentwining.
This drawing of the Tangle Deck card for Onomato is an example of Zentwining.

I discovered the technique of Zentwining as I was working on the drawings for the fronts of the Tangle Deck cards. I needed a drawing for the tangle Onomato.  I picked up a piece of paper that I had drawn some random overlapping curved pencil lines on and began to draw ribbons wrapping around the lines. I then filled each ribbon with a variation of Onomato. I really liked the result and thought “this could be a technique that could be repeated easily.” I decided to share it and call the technique Zentwining.

1. The first step is to draw some overlapping curving pencil lines as in the following examples.

zentwined strings

2. Next start drawing in ribbons that wrap around these lines. The ribbons are drawn in a similar way to the technique used in the tangle Aquafleur. I’ve used both re-curve and c-curve versions as shown below.

recurve c-ribbon

Here is an example.

add ribbon

3. Ribbons can go in any direction, extend off the page, and even cross lines. Using the Hollibaugh method of drawing behind makes it even more interesting.

All ribbons

4. Once you are satisfied with the quantity and placing of your ribbons, the next step is to draw over the pencil lines with pen making sure you stop at the edge of each ribbon and then start up again on the other side. Here is an enlargement so you can see what I mean.

detail

Here is the drawing with all the lines drawn in pen except where the ribbons cross.

lines

5. Now start adding tangles to the ribbons. You can use variations of one tangle as I did for the Onomato card or use different tangles.

add tangles

As you can see, any remaining pencil lines are beginning to disappear into the tangles.

all tangles

6. The final step is to add shading. I add shading to the tangles themselves first, then I add just a touch of shading to each side of the string lines to add a little 3D effect (makes the shapes formed by the strings kind of puffy.) Lastly I add shading to the ribbon shapes if I think it needs it.

Here are a couple of finished examples.

Done

I will admit that this technique can take some concentration as it can get kind of busy as you work on it. Just take it slowly and be aware of your strokes and you’ll do fine. Hope you have fun playing with this technique and I look forward to seeing what you come up with.

Lynn Mead, CZT